
Monitoring serial communications sent by a micro-controller, such as an Arduino, is one of the most common uses for MegunoLink Pro. In this post we’ll look at how to how to monitor serial messages sent by a simple Arduino program that sends a greeting and counter value every second.
A Simple Arduino Test Program
Here’s the program. Its just a simple one to test serial communication with the Arduino. Each second, it is going to send out Hello World followed by a number that keeps getting bigger and bigger.
|
1 2 3 4 5 6 7 8 9 10 11 12 13 14 15 16 17 18 |
uint32_t LastSendTime = 0; int Counter = 0; void setup() { Serial.begin(57600); } void loop() { if (millis() - LastSendTime > 1000) { Serial.print("Hello World "); Serial.println(Counter); Counter = Counter + 1; LastSendTime = millis(); } } |

The test program in the Arduino IDE
I’ve entered this program used the Arduino IDE. Download the Arduino IDE, if you don’t already have it. And SparkFun Electronics have a wide selection of Arduino boards, if you don’t already have one. With the Arduino board plugged in, make sure the right board type and port is selected (from Boards and Serial Port menus on the Tools menu), then choose Upload from the File menu. All going well, you’ll see the serial transmit light blink every second. Let’s hop over to MegunoLink Pro to see what it is saying…
Getting Ready in MegunoLink Pro
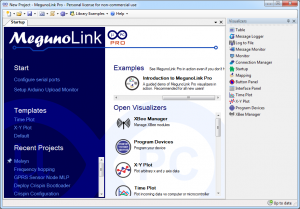
The visualizer toolbox is docked to the right of the MegunoLink Pro window when it first starts.
MegunoLink Pro uses visualizer windows to present data it receives from a serial port in different formats. When you launch MegunoLink Pro from the Windows Start menu, you’ll see a list of all the visualizers in the Start page and in a toolbox docked to the right of the main window. If the toolbox isn’t visible, click on the visualizers button ( ) to show it. You can also click the arrow next to the visualizers button to get a menu of the visualizers available. And you can open visualizers directly from the MegunoLink Pro start page. MegunoLink Pro is all about visualizers and there are many ways to find them!
Our program is sending plain text, so we’ll use a Monitor visualizer to look at it. We’re also going to need a Connection Manager window to setup the serial connection to the Arduino. Click on Connection Manager and Monitor in the visualizers toolbox to open up one of each. You can drag the visualizer windows around by the tab at the top until you get a layout that you like. Something like this should work well for now (notice I’ve hidden the visualizer toolbox by clicking the pushpin on the toolbox’s title bar):

For this project, we need Monitor and Connection Manager visualizers. The Monitor window will show text that MegunoLink Pro receives from the Arduino; the Connection Manager is used to setup communication with the device. Visualizer windows in MegunoLink Pro can be rearranged by dragging the tab at the top of each window.
Preparing the Connection
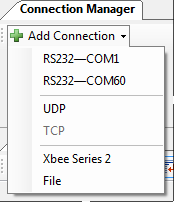
A list of available serial ports and connection options is presented when you click the Add Connection button.
The first thing to notice is that no data is appearing in the Monitor window and its connection button says Create Source. You could have 1, or 2, or 10 Arduino’s connected to your system; you might use serial ports or Ethernet ports to connect them. Whatever setup you have, use the Connection Manager to tell MegunoLink Pro how to communicate with your devices. You’ll see a list of all the available options when you click the Add Connection button in the Connection Manager. Select the serial port your device is connected to and a new source panel will appear.

You can name a source, select which COM port it is using and the baud rate using the Connection Manager. The Advanced button presents additional options for handshaking, which are not needed for Arduino devices. Each additional source will appear in its own panel; there is no limit to the number of connections that MegunoLink Pro can use.
In the connection panel, seen above, you can give each serial source a name. This name appears on the connect buttons in every visualizer that uses the port so it is easy to see which device the data is coming from when several are connected at the same time. It can also appear on the visualizer tab: right-click on the tab and choose Show Source to have the source name appear on the tab. Select Show Port to have the port appear on the tab.
The baud rate is also set in the Connection Manager. This controls the speed of communication between MegunoLink Pro and the hardware device. In the Arduino program, the baud rate is set in the Serial.begin(57600); command — the baud rate is the value in parenthesis. Both the Arduino and MegunoLink Pro must be set to exactly the same baud-rate otherwise you’ll see gibberish or nothing in the monitor window. Most programs use 9600 as the default baud-rate, but the program here is working much faster. So we need to change the baud rate setting in MegunoLink Pro to match: simply select 57600 from the combo box next to the port number.
Start Monitoring

After the source is configured, press the Connect button and data will start appearing in the Monitor window.
Hit the Connect button on the source panel, or any of the source selectors found at the top of each visualizer window, and the data will appear in the Monitor window.
Buttons on the Monitor visualizer’s toolbar let you connect & disconnect or choose a new source, save the content of the monitor window to a file, enable or disable word wrapping for long lines, add a time-stamp to each line in the monitor window or clear the data received so far. At the bottom of the window, you can send commands to the Arduino for processing.
Save the Project
You can save MegunoLink Pro layouts in a project file by clicking the Save icon on the top toolbar. Open previously saved projects using the Open button and browse for the saved project, or click the small arrow next to the Open button to see recently used projects. To start afresh, use the New Project button on the toolbar. When you click the New Project button, MegunoLink Pro will load the default layout. If you’ve a favorite layout you’d like used for new projects, you can save it as the default. To save a default layout, click the small arrow next to the Save button and choose Save as Default.
MegunoLink Pro also supports template files. Template files contain layout and configuration information just like project files. But when you save a project that was created from a template, MegunoLink Pro prompts you for a new filename. So you can make a set of templates to suit the different kind of projects you create. To save a project as a template file, select Save as Template from the drop-down menu attached to the Save button.
Well that’s a quick intro to one of the most popular MegunoLink Pro visualizers, the Monitor window. Download a free trial of MegunoLink Pro and give it a go, or hop over to our forum and join in the discussion. We’d love to hear from you!


