
Have you ever been late for a meeting and tripped on a micro USB cable, simultaneously loosing a critical data set and messing up your hair? No? Let’s keep it that way by sending Arduino data to a computer using UDP over WiFi!
This project will remove annoying cables from your data collecting life while still giving you live data and an easy setup. How is this possible you may ask?
Well a UDP connection over WiFi can be used like a wireless serial port. So you can connect an ESP8266 WiFi board to any computer running MegunoLink.
I used a WeMos D1 mini ESP8266 WiFi/microcontroller.
Read on for all the details you need to make the switch to wireless data collection.
Wireless Connection
What is UDP?
UDP stands for User Datagram Protocol. It is a network communication protocol designed back in 1979 by John Postel. UDP provides “…a procedure for application programs to send messages to other programs with a minimum of protocol mechanism” (IEN-88). The downside is that UDP packets have no guaranteed delivery, but in practice the chance of loosing a packet is pretty small.
So for practical purposes, UDP is an easy way to send data between a microcontroller, such as an Arduino, and a computer across a local network. Just like a serial port…but no wires!
Just how easy is it? Well, unlike the Transport Control Protocol (TCP), UDP messages can be broadcast to all devices on a local network rather than needing a specific address. This means you don’t have to worry about static IP addresses or name resolution to connect two devices, just use the Broadcast IP Address of “255.255.255.255” and every device on the local network should get the message.
Of course not every device is going to want your messages. So UDP has ports to create communication channels between the sender and the receiver.
A port is just a number between 0 and 65535 that the sender and receiver agree on. So for our purposes, all you have to do is pick a port number for the Arduino to use to send data to and type the same port number into MegunoLink so it knows where to listen.
Pick a number, it’s that simple*.
* Ok, not quite. Many numbers are already in use or are reserved but any number between 49152 to 65535 should be fine. You can check the status of any port number on the port number registry.
MegunoLink UDP Connections
MegunoLink can receive and transmit data over UDP as easily as it can over serial (RS232), an XBee Series 2 connection or even a text file.
To create a UDP connection, just:
- create a Connection Manger Visualizer (if you don’t have one open already),
- click the “Add Connection” drop-down button,
- select “UDP”,
- type your chosen UDP port number into the “Receive Port” box and,
- hit “Connect”!
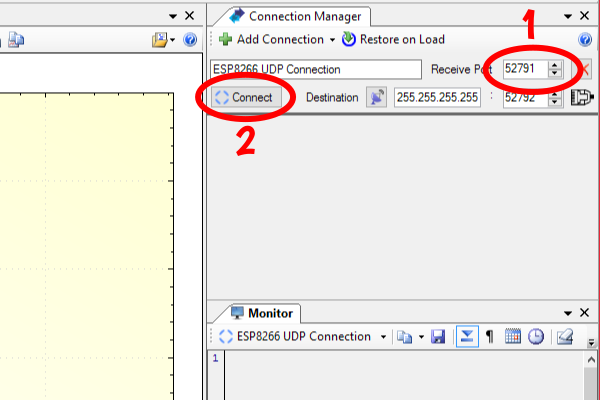
To open a UDP Connection simply check the receive port number matches the sending one in your Arduino sketch and click “Connect”
UDP connections through MegunoLink can be used for remote control of systems as well as monitoring. Just choose another port number for transmitting data in the other direction to establish two-way communication.
Check out these links for more information:
- Getting started with serial connections
- Connection Manager documentation
Arduino UDP over WiFi
|
1 2 3 4 5 6 7 8 |
void loop() { ⋮ udp.beginPacket(destinationIp, DESTINATION_UDP_PORT); udp.print("Hello World!"); udp.endPacket(); ⋮ } |
Sending UDP messages over WiFi is easy with the WiFiUDP library included with the ESP8266 core for Arduino (install instructions later in this post).
It functions just like the UDP components of the Ethernet library included with the Arduino IDE. After some includes, a declaration and a quick setup which are all covered later in the later guts of this post all you need to do to send data is:
- call
.beginPacket(…)supplying the destination IP address (or 255.255.255.255 for broadcast) and your chosen port number, - call
.write()or.print()to add the data you want to send to the packet, and - call
.endPacket()to send the packet when you’re done.
Nice.
ESP8266 WiFi Connection Manager

Configuring the ESP8266 WiFi connection is easy with the captive portal generated by the WiFiManager library
A common challenge with WiFi devices is joining the network and setting up the password. The awesome WiFiManager library by tzapu makes this really easy for Arduino’s using the ESP8266 module.
Once the library is installed (details below), it will create a hot spot you can connect to with your phone or table. A web-page will popup to configure the Arduino’s WiFi connection when you join the network. This method of having a page open after connecting to a WiFi access point is known as “captive portal” and is often used to present a login page before giving access to the wider internet in hotels.
|
1 2 3 4 5 6 |
void setup() { ⋮ wiFiManager.autoConnect(); ⋮ } |
All you need to do to use this, besides includes and a declaration covered later, is add a single line to your setup() function as shown above. Simple!
The configuration is saved to EEPROM so you don’t have to input it again, even if you loose power or upload a new program version. The manager will start a configuration access point up again for you if the saved WiFi connection cannot be established.
Data Plotting
Temperature and Humidity Sensing
Today’s project is measuring temperature and humidity using a DHT11 sensor on a shield for the WeMos D1 mini. The DHT11 measures temperature from 0 to 50 °C with a resolution of 1°C and humidity from 20 to 90% RH with a resolution of 1%.
I’m going to graph the data with MegunoLink.

A DHT11 on a WeMos D1 mini Shield
Embedded Exponential Filter
Unfortunately this sensor has a low-resolution and noisy measurements. An exponential filter is an easy way to solve this problem with the Arduino. This filter smooths measurements by combining new values (xn) with the previously filtered value (yn – 1) to calculate the new filtered value (yn):
yn = w × xn + (1 – w) ex× yn – 1
The previous and new values are combined with a weighting factor w. The weight must be between 0 and 1.
Weights close to 1 will make the filter favor new values and respond faster to changes, but will reduce the smoothing. Values close to 0 will favor previous values removing lots of noise, but it will respond slowly to changes. Just Find the balance that works for your situation by tweaking the value.
You don’t have to implement the filter yourself though. We’ve included a Exponential Filter in our Megunolink Arduino library.

The MegunoLink Exponential Filter library allows us to see both the raw measurements and a cleaned version
I sent both raw measurements and filtered values over UDP for plotting to see the effect of the filter.
I used an initial value of 25°C for the temperature filer and 50%RH for the humidity filter. This makes the filter a bit quicker to settle when the program starts. You can change the initial values in the filter declaration.
MegunoLink Time Plot

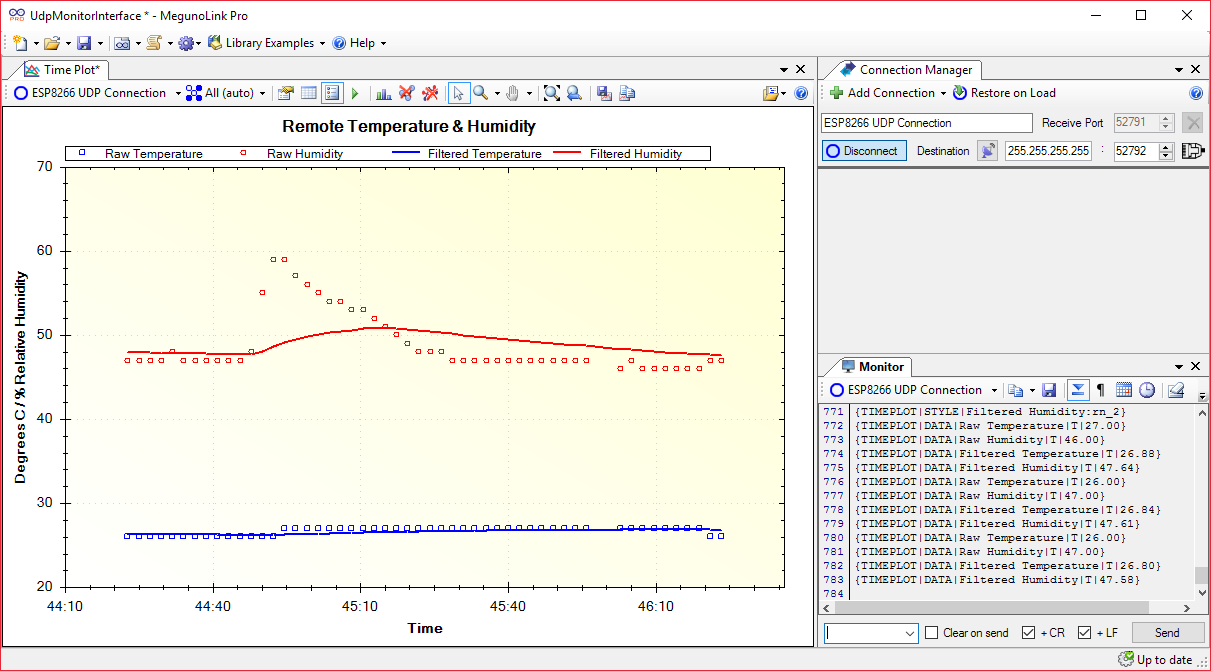
This Time Plot shows how the exponential filter (lines) reduces the effect of small fluctuations in measurements (points)
MegunoLink’s Time Plot Visualizer provides a simple way to plot the temperature and humidity measurements sent by the ESP8266 sensor. MegunoLink looks for messages surrounded by braces (‘{‘ … ‘}’) like:
{TIMEPLOT|DATA|Raw Temperature|T|26.84}.
Here:
TIMEPLOT|DATA|signals the start of a message for the time-plot;Raw Temperatureis the series name for the data,|T|tells MegunoLink to use the current time for the x-axis and26.84is the temperature measurement we’d like to plot.
So if the current temperature is stored in a variable name temperature and udp is a WiFiUDP variable, you can send temperature to MegunoLink using:
|
1 2 3 4 5 |
udp.beginPacket(destinationIp, DESTINATION_UDP_PORT); udp.write("{TIMEPLOT|DATA|Raw Temperature|T|"); udp.print(temperature); udp.write("}\n"); udp.endPacket(); |
But that’s quite a concoction to remember. So we built a plotting library for Arduino which takes care of the details. To use the library #include "MegunoLink.h" at the top of your program. Then you can:
|
1 2 3 4 |
TimePlot Plot("ESP8266", udp); udp.beginPacket(destinationIp, DESTINATION_UDP_PORT); Plot.SendData("Raw Temperature", temperature); udp.endPacket(); |
Here:
udpis theWiFiUDPvariable for sending data through the ESP8266’s UDP connection,Raw Temperatureis the series name for the data, as before,temperatureis the variable containing a temperature measurement.
Check out our introduction to plotting data with MegunoLink or the detailed Time Plot documentation for more information.

MegunoLink Project
In MegunoLink you can build window layouts that include graphs, tables, logging, interface panels and more. These interfaces can be saved in a project file so you can use them again or share them.
The MegunoLink UDP Monitor Interface designed for this project
The MegunoLink project created for this project can be found in our Arduino-ESP8266-UDP-Monitor github repository along with the matching Arduino sketch.
It should allow you to get up and running with little effort, just follow the UDP connection instructions given earlier and the plot will format itself based on the data from the Arduino program. You can read more about how to customise the interface or create your own in the article about Interface Panels.

Data Logging

Any connection can be logged to a text file in MegunoLink in addition to plotting or other visualizers
Simply add a “Log to File” visualizer to log the data as well as plotting it. Find out more in the documentation on Logging Data.
Well that’s all the cool stuff you can do with this project, here’s some details on how to buy and install everything.
Hardware
ESP8266: Compact WiFi/Microcontroller Module
All of this would have been harder and more expensive to do with a traditional Arduino board with a WiFi shield. The ESP8266 module on offers a microcontroller capable of many simple tasks combined with convenient WiFi in a single compact, cheap module. Thanks to the ESP8266 core for Arduino and tzapu’s WiFiManager library, connecting an ESP8266 to WiFi and a UDP connection are easy. Just choose a dev board with it on and away you fly.
WeMos D1 Mini

A WeMos D1 mini with headers attached
I used a WeMos D1 mini development board with ESP8266 module in this article. The WeMos D1 mini is available on AliExpress for $USD4.00 from the original manufacture. WAVGAT has a clone, the D1 Mini for only $USD2.85.
Of course there are many ESP8266 development boards out there, all of which should work fine to send UDP data to MegunoLink. Some options are:
- WeMos D1 R2 V2.1.0 WiFi uno based ESP8266 for arduino nodemcu Compatible
- NodeMcu style boards such as the V3 4M bytes (32Mbits) FLASH NodeMcu Lua WIFI Networking development board Based ESP8266 with firmware
- SparkFun ESP8266 Thing – Dev Board
- SparkFun ESP8266 Thing, (includes battery charger)
- Adafruit HUZZAH ESP8266 breakout
- Adafruit Feather HUZZAH with ESP8266 WiFi (includes USB serial and a battery charger)
Post a comment below if you find another board that fits the bill, or let us know if any don’t make the grade.
One nice aspect of the D1 mini family are the handy shields available for them. Including a DHT11 temperature and humidity sensor used here. You can find the full selection in D1 mini Shields on AliExpress.
DHT11: Basic Temperature and Humidity
If your looking for something other than the D1 mini shield with the DHT11 mentioned above, a DHT11 on a breakout board with the necessary data line pull-up resistor such as the DHT11 Temperature And Relative Humidity Sensor Module can be found for as little as USD$1.70 at the time of writing from AliExpress. If you’re fine with adding your own resistor, the sensor by its self can be found for USD$0.70 on AliExpress or as the DHT11 basic temperature-humidity sensor + extras for USD$5 on Adafruit.
Alternatively you could use the more precise DHT22 sensor also supported by the sensor library.
Software
MegunoLink
MegunoLink is a tool to support Arduino development. Use MegunoLink to build an interface for your project including graphs, buttons, charts, tables and more. Download a free trial of MegunoLink to get started with wireless temperature recorder.
ESP8266 Core for Arduino Installation
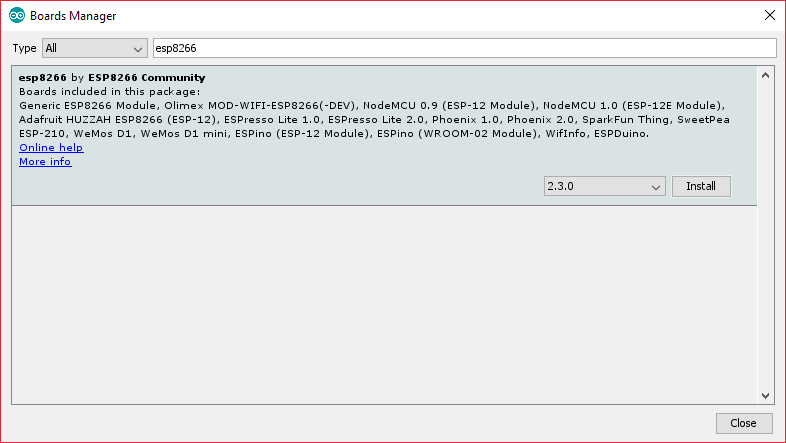
Installing the ESP8266 core for Arduino is done nicely by the Arduino IDE Boards Manager
You can install the ESP8266 core for Arduino any one of four the ways described on its GitHub page. In this case I used the first method, searching for and installing the “esp8266” entry in the Arduino Boards Manager (Tools>Board>Boards Manager…). After installation you should be able to select your board from the board list and upload.
One thing to be careful with is pin numbers. For the WeMos D1 mini the GPIO numbers of the ESP8266 are different to the “D1” “D2” numbers marked on the board. To use the ESP8266 numbers, just use the number (eg. “2”) in the Arduino IDE. To use the D1 mini numbers, just put a “D” in front (eg. “D4”).
WiFiManager
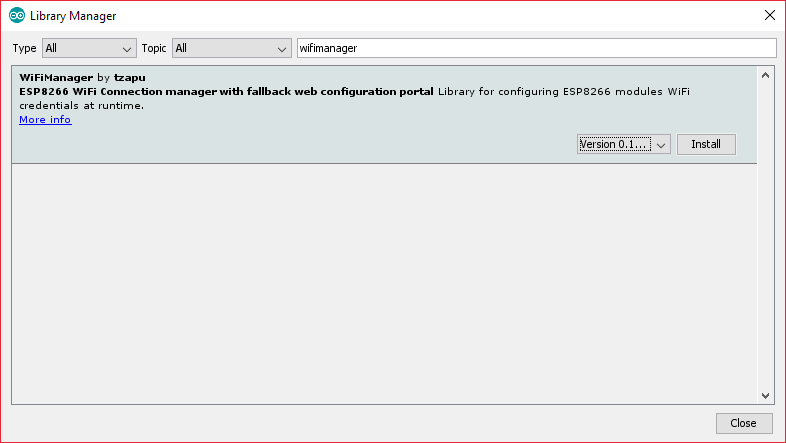
Installing the WiFiManager library is simple through the Arduino IDE Library Manager
tzapu’s WiFiManager library can also be installed from GitHub or using the Arduino library manager. In the library manager, (Sketch>Include Library>Manage Libraries…) just search for and install the “WiFiManager” library.
|
1 2 3 4 5 |
#include "DNSServer.h" #include "ESP8266WebServer.h" #include "WiFiManager.h" WiFiManager wiFiManager; |
Just add the three includes and global variable declaration for a WiFiManager at the top of your sketch to use the library. Call wiFiManager.autoConnect() in setup() to initialize the WiFi connection and create the captive portal for configuring it.
WiFiUDP
The WiFIUDP library is included in the ESP8266 core for Arduino. Simply add the two includes, definitions and declaration shown below to the top of your program. In setup() call the udp.begin(…) method to initialize UDP communications.
|
1 2 3 4 5 6 7 8 9 10 11 12 13 14 15 16 17 18 |
#include "ESP8266WiFi.h" #include "WiFiUdp.h" #define SOURCE_UDP_PORT 52792 #define DESTINATION_UDP_PORT 52791 #define DENSTINATION_IP_ADDRESS 255,255,255,255 IPAddress destinationIp(DENSTINATION_IP_ADDRESS); ⋮ ⋮ void setup() { ⋮ udp.begin(SOURCE_UDP_PORT); ⋮ } |
MegunoLink Exponential Filter Library

Installing the MegunoLink Arduino libraries is quickly done through the Arduino integration setup in Megunolink
The exponential filter library is one of the many useful libraries provided with MegunoLink. Simply setup the Arduino Integration using the option in MegunoLink shown above. More details can be found in the article on Arduino Integration.
|
1 2 3 4 5 |
#include "MegunoLink.h" #include "Filter.h" ExponentialFilter temperatureFilter(WEIGHT, INITAL_VALUE); ExponentialFilter humidityFilter(WEIGHT, INITAL_VALUE); |
Once installed, just add the includes and declarations shown above to the top of your program with the values you want for the weight (0-100) and initial value.
DHT11 Library
Several libraries are available for the DHT11 and its close relations. In this case I chose to use the Adafruit DHT-sensor-library. You’ll need the Adafruit Unified Sensor library as well. Both are available on GitHub and can also be installed with the Arduino Library Manager.
|
1 2 3 4 5 6 |
#include "DHT.h" #define DHT_TYPE DHT11 #define DHT_DATA_PIN D4 DHT dhtSens(DHT_DATA_PIN, DHT_TYPE); |
Put the include, definitions and variable declaration shown above in the top of your sketch, remembering to change the pin number to whatever is needed for your board.
|
1 2 3 4 5 6 |
void setup() { ⋮ dhtSens.begin(); ⋮ } |
Start up the library in your setup as above.
|
1 2 3 4 5 6 7 |
void loop() { ⋮ float temperature = dhtSens.readTemperature(); float humidity = dhtSens.readHumidity(); ⋮ } |
Take measurements in your program as above.
Full Example Code
So here’s the full example that brings together all the parts. You can get the latest version of the ESP8266 temperature and humidity monitor from our GitHub library.
The GitHub library also includes a MegunoLink project to plot temperature and humidity with ESP8266 Arduinos.
|
1 2 3 4 5 6 7 8 9 10 11 12 13 14 15 16 17 18 19 20 21 22 23 24 25 26 27 28 29 30 31 32 33 34 35 36 37 38 39 40 41 42 43 44 45 46 47 48 49 50 51 52 53 54 55 56 57 58 59 60 61 62 63 64 65 66 67 68 69 70 71 72 73 74 75 76 77 78 79 80 81 82 83 84 85 86 87 88 89 90 91 92 93 94 95 96 97 98 99 100 101 102 103 104 105 106 107 108 109 110 111 112 113 114 115 116 117 118 119 120 121 122 123 124 125 126 127 128 129 130 131 132 133 134 135 136 137 |
/* Example sketch for measuring temperature and humidity using a DHT11 * connected to an ESP8266-based WeMos D1 R1 and relaying the data to * a PC running MegunoLink Pro using UDP over WiFi for data logging and * visualisation. * Written by Elliot Baptist 17/1/9 for Number Eight Innovation * Uses DHT-sensor-library by Adafruit and WiFiManager by tzapu */ #include "DNSServer.h" // for redirecting to the configuration portal #include "ESP8266WebServer.h" // for serving the configuration portal #include "WiFiManager.h" // WiFi configuration #include "DHT.h" // Adafruit DHT-sensor-library #include "MegunoLink.h" // functions for communicating to Megunolink Pro #include "Filter.h" // Megunolink exponential filter functions #include "ESP8266WiFi.h" // ESP8266 core WiFi Arduino library #include "WiFiUdp.h" // UDP communications // DHT sensor type #define DHT_TYPE DHT11 // DHT sensor pin definition, used to communicate with the DHT11 #define DHT_DATA_PIN D4 // Note: pin "4" (ESP8266 GPIO4) // is different to pin "D4" (GPIO2 marked as "D4" on the WeMos D1 mini dev board) // UDP connection configuration #define SOURCE_UDP_PORT 52792 // UDP port to receive from #define DESTINATION_UDP_PORT 52791 // UDP Port to send to #define DENSTINATION_IP_ADDRESS 255,255,255,255 // comma seperated IP Address to send measuremets to, // use 255,255,255,255 for all devices on network // Declare global variables -------------------------------------------------------- // WiFi connection management WiFiManager wiFiManager; // Initialise the DHT11 sensor DHT dhtSens(DHT_DATA_PIN, DHT_TYPE); // Exponential filters for measurements ExponentialFilter temperatureFilter(5, 25); // filter for temperature ExponentialFilter humidityFilter(5, 50); // filter for humidity // UDP connection management WiFiUDP udp; // Destination IP Address to use for UDP IPAddress destinationIp(DENSTINATION_IP_ADDRESS); // Keep track of measurement transmissions, // will overflow after 4,294,967,295 measurements unsigned long transmitCount = 0; // setup ---------------------------------------------------------------------- setup void setup() { // Open debug serial connection Serial.begin(9600); Serial.println(""); Serial.println("DHT11+ESP8266 WiFi UDP to MegunoLink Data Logger"); // Configure built in LED pin as output so it can flash as a 'heartbeat' pinMode(LED_BUILTIN, OUTPUT); // Start sensor communication library dhtSens.begin(); // Connect to WiFi. Will start a captive portal access point for configuration // if cannot connect to the last saved connection or is first time setup. // To access configuration portal, connect to ESP over WiFi // with phone/PC/tablet Serial.print("Attempting to connect to WiFi: "); wiFiManager.autoConnect(); Serial.println("connected!"); // Start WiFi UDP communication library udp.begin(SOURCE_UDP_PORT); // Done Serial.println("Startup complete, debug serial stream:"); } // loop ------------------------------------------------------------------------ loop void loop() { // Read sensor float temperature = dhtSens.readTemperature(); // in degrees celsius float humidity = dhtSens.readHumidity(); // in percent relative humidity // Debug serial output of raw tab seperated values Serial.print("Temperature [degC]\t"); Serial.print(temperature); Serial.print("\tHumidity [%RH]\t"); Serial.print(humidity); Serial.println(""); // Add values to filters if they are valid if(!isnan(temperature) && !isnan(humidity)) { temperatureFilter.Filter(temperature); humidityFilter.Filter(humidity); } // Start assembling UDP packet udp.beginPacket(destinationIp, DESTINATION_UDP_PORT); TimePlot Plot("DHT", udp); // Add plot display information every so often for late listeners if (transmitCount % 10 == 0) { Plot.SetTitle("Remote Temperature & Humidity"); Plot.SetXlabel("Time"); Plot.SetYlabel("Degrees C / % Relative Humidity"); Plot.SetSeriesProperties("Raw Temperature", TimePlot::Blue, TimePlot::NoLine, 1, TimePlot::Square); Plot.SetSeriesProperties("Raw Humidity", TimePlot::Red, TimePlot::NoLine, 1, TimePlot::Circle); Plot.SetSeriesProperties("Filtered Temperature", TimePlot::Blue, TimePlot::Solid, 2, TimePlot::NoMarker); Plot.SetSeriesProperties("Filtered Humidity", TimePlot::Red, TimePlot::Solid, 2, TimePlot::NoMarker); } // Add raw measurements Plot.SendData("Raw Temperature", temperature); Plot.SendData("Raw Humidity", humidity); Plot.SendData("Filtered Temperature", temperatureFilter.Current()); Plot.SendData("Filtered Humidity", humidityFilter.Current()); // Send and increment counter udp.endPacket(); transmitCount++; // Wait a little while before making next measurment delay(2000); // delay in milliseconds } |
With that I leave you to cut the cord, and discover wireless data collection with MegunoLink. Let us know how you get on with a comment below. If you have any trouble, head on over to the MegunoLink forum to post your questions.


