MegunoLink supports TCP Client connections to a TCP Server in your Arduino sketch over WiFi or wired Ethernet connections. Arduino hardware supporting TCP connections includes:
- ESP8266, a low-cost Arduino with built-in WiFi
- ESP32, a low-cost Arduino with built-in WiFi and bluetooth
- EtherTen, an Uno compatible Arduino with built-in Ethernet
- Ethernet shield, an Arduino compatible shield that adds an Ethernet connection

Create new connections from the Add Connection menu.
Creating a TCP Client Connection
To create a TCP Client connection in MegunoLink:
- Open a connection manager visualizer
- Choose TCP Client from the Add Connection drop-down menu.
A configuration panel for the new TCP Client connection will be added to the Connection Manager:

A TCP Client connection panel with the mDNS addressing option selected
Configuring the Connection
The TCP Client connection panel displayed in the Connection Manager is used to configure the connection.
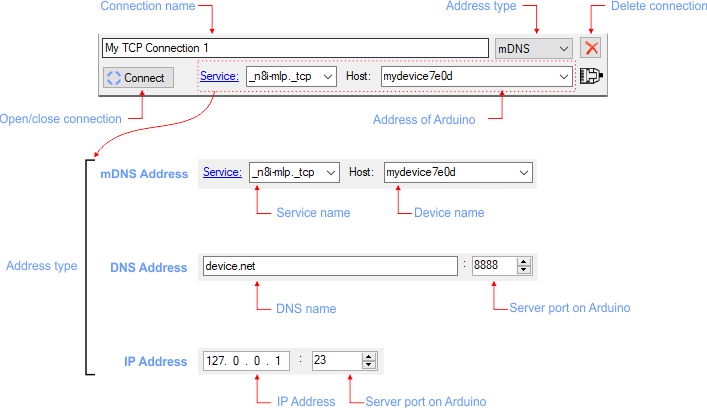
Configure the TCP Client connection in the Connection Manager
The controls for configuring the connection are:
- Connecton name: a free-form name to help you identify the connection. This name will be displayed on the Connection Selector.
- Address type: selects the type of address to use for connecting to the remote device.
- Delete connection: remove the connection from the project.
- Connect/Disconnect: open/close the connection to the remote device.
- Remote address: address of the remote device you are connecting to. The appearance of the remote changes depending on the type of address selected.
To connect to a remote device you must know its address. The TCP Client lets you supply the remote device’s address using several common methods including:
- mDNS Address: each device advertises the services it supports and its name on the local network. You can select the service and device name from the drop-down controls. Click the Service link to open the mDNS Browser window to configure available services.
- DNS Address: if your device is registered with a domain name server (DNS) you can enter its DNS address and the port on the remote device that MegunoLink will connect to.
- IP Address: enter the IP address of the remote device and the port MegunoLink will connect to.
Arduino TCP Server
For MegunoLink to connect to a remote device it must be running a TCP Server. Use the WiFiServer class to create a WiFi Server in your Arduino program.
For example, to create a TCP Server on a wireless Arduino such as the ESP32 or ESP8266, you can use:
|
1 2 3 4 5 6 7 8 9 10 11 12 13 14 15 16 17 18 19 20 21 22 23 24 25 26 27 28 29 30 31 32 33 34 |
#include <SPI.h> #include <WiFi.h> char ssid[] = "myNetwork"; // your network SSID (name) char pass[] = "myPassword"; // your network password int status = WL_IDLE_STATUS; WiFiServer server(80); void setup() { // initialize serial: Serial.begin(9600); Serial.println("Attempting to connect to WPA network..."); Serial.print("SSID: "); Serial.println(ssid); status = WiFi.begin(ssid, pass); if ( status != WL_CONNECTED) { Serial.println("Couldn't get a wifi connection"); while(true); } else { server.begin(); Serial.print("Connected to wifi. My address:"); IPAddress myAddress = WiFi.localIP(); Serial.println(myAddress); } } void loop() { } |

